
Whether you're upgrading your home network, setting up a new office connection, or simply tidying up messy cables, terminating an Ethernet cable into an RJ45 jack is a practical skill that can significantly improve your network’s reliability and performance. GLGNET is your go-to source for reliable RJ45 jacks—offering high-performance components that comply with CAT5e specifications and support over 750 insertion cycles. In this step-by-step guide, we’ll walk you through RJ45 Jack the entire process—from gathering materials to testing the final connection—ensuring a clean, secure, and professional-grade result.
Learn more:
https://www.glgnet.biz/selecting-the-correct-rj45-jack-connector
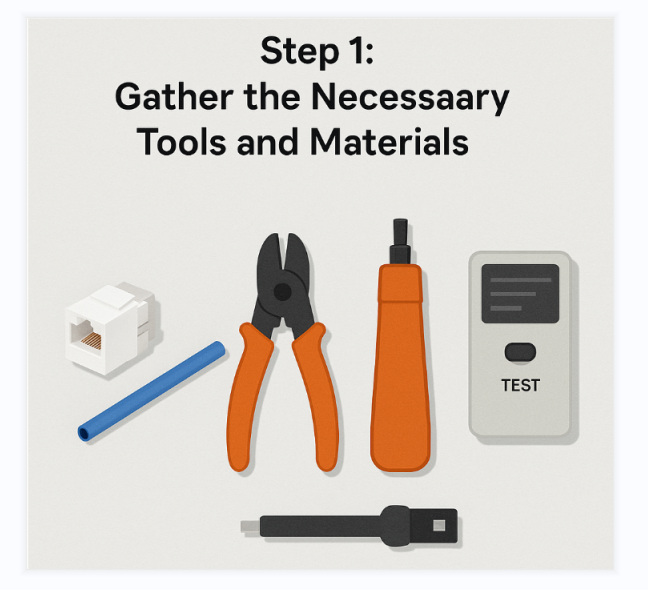
Before diving into the installation process, it’s important to first gather all the tools and components you'll need. This not only ensures a smooth workflow but also minimizes the risk of errors caused by missing items. At a minimum, you’ll need an RJ45 keystone jack (or a wall jack if you're planning to mount it), an Ethernet cable—preferably Cat5e or Cat6 depending on the required data speed—along with a wire stripper or cable cutter to remove the outer sheath. A punch-down tool is essential to properly seat the wires into the jack, and while optional, a cable tester is highly recommended to confirm everything is connected as it should be. Having all of these ready ahead of time helps make the job quicker and more efficient.
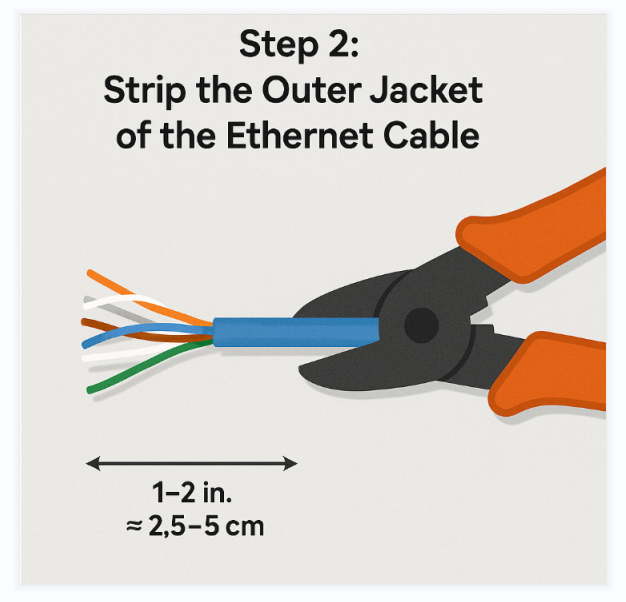
With your tools in hand, begin by preparing the Ethernet cable. Carefully strip off about 1 to 2 inches (approximately 2.5 to 5 cm) of the outer jacket. To do this, hold the cable securely and use your wire stripper to score around the outer sheath without applying too much pressure. Once scored, bend the cable gently back and forth until the outer layer loosens and can be removed easily. Take extra care during this step—accidentally cutting or nicking the small colored wires inside can compromise the signal quality or cause the connection to fail entirely. Once stripped, you’ll expose four twisted pairs, totaling eight individual wires that you'll work with in the next step.
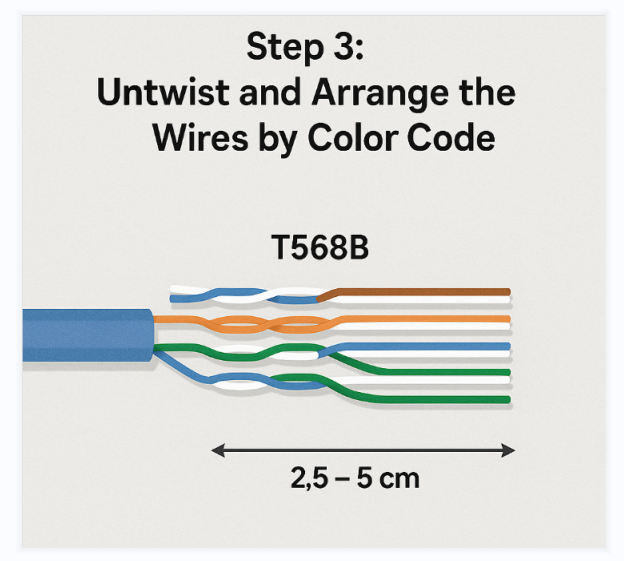
After exposing the inner wires, untwist each of the four pairs and straighten them out as much as possible. At this point, you need to choose a wiring scheme: T568A or T568B. Both are industry standards and perform similarly, but it’s crucial to use the same standard at both ends of the cable to ensure proper communication. For example, if you're using the T568B scheme (commonly used in the US), the correct wire sequence from left to right—facing the jack with the clip side down—should be: White-Orange, Orange, White-Green, Blue, White-Blue, Green, White-Brown, and Brown. Once arranged, trim the wires evenly to get them ready for punching into the rj45 coupler jack. This step is all about precision; misaligned wires can cause network problems later.
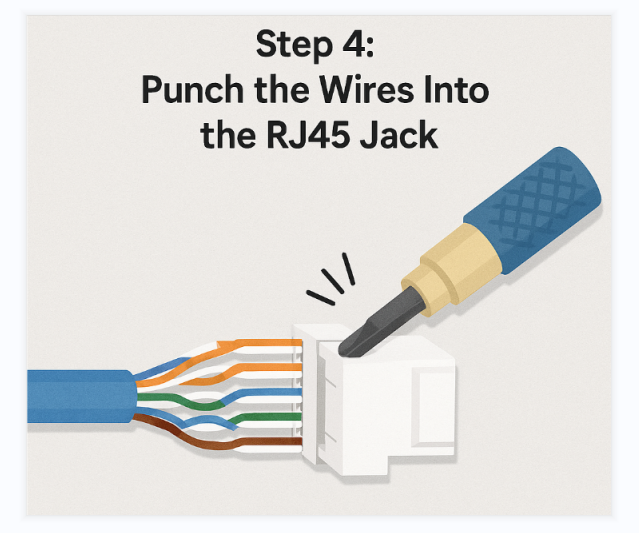
Now that the wires are neatly arranged and trimmed, it’s time to connect them to the jack. Look at your RJ45 jack and find the small color-coded slots, which indicate where each wire should be placed. Match each wire to its designated slot according to the color code you've chosen. Carefully press the wires into the slots one by one. Once they’re in position, use your punch-down tool to firmly push each wire down into the slot. This tool ensures the metal contacts inside the jack pierce through the wire insulation, creating a secure and reliable connection. Most punch-down tools will also trim off any excess wire during this process. If not, simply cut off the extra ends with a pair of scissors. Take your time here—a good connection starts with proper wire seating.
With the wiring securely punched down, the next step is to finish assembling the rj45 coupler jack. Depending on your specific setup, this might involve snapping a protective cap over the wired section, or mounting the jack into a faceplate, surface box, or wall plate. Make sure everything clicks into place or is screwed in firmly. A loose jack or misaligned housing can not only look untidy but also lead to unreliable connectivity down the line. At this stage, double-check that everything is flush and stable—it’s always easier to fix alignment issues now than after the cable is in use.
The final and crucial step is to test your connection to ensure the RJ45 connector is correctly terminated. Plug an Ethernet cable into the RJ45 jack you’ve just installed, then connect the other end to a network device or a cable tester. Running a full test will help identify common issues such as open wires, miswiring, shorts, or reversed pairs that could affect network performance.

This verification ensures your wiring is accurate and the RJ45 modular jack connector is securely connected. If everything passes the test, your installation is complete. If problems arise, double-check the wire arrangement and make sure each conductor is firmly seated in its slot. Re-punch any loose wires as needed. Spending a bit more time on this step can prevent frustrating connection issues later on.
Learn more:
https://www.glgnet.biz/shielded-vs-unshielded-rj45-jack-which-one-fits-your-network
https://www.glgnet.biz/rj45-magjack-design-mistakes-top-errors-to-avoid-and-how-to-fix-them
https://www.glgnet.biz/what-is-an-rj45-magjack-and-why-it-matters-in-industrial-networking
Conclusion
By following these six steps, you’ll have successfully installed an RJ45 jack that not only looks tidy but also delivers stable and high-speed network performance. Taking the time to properly strip, arrange, and punch down each wire ensures signal integrity and minimizes future troubleshooting.