
Connecting a Cat6 cable to an RJ45 connector is a fundamental skill for setting up Ethernet networks. This comprehensive guide will walk you through the process step-by-step, ensuring that you achieve a secure and reliable connection. We’ll cover essential tools, detailed instructions, and best practices to help you avoid common pitfalls.
Before you begin, make sure you have the following tools and materials:
· RJ45 Connector (Mail RJ45): This connector is essential for attaching to the ends of your Cat6 cable. It comes in various types, including shielded and unshielded.
· Cat6 Ethernet Cable: Choose a high-quality Cat6 cable to ensure optimal network performance. The Cat6 standard supports higher speeds and bandwidth compared to previous cable categories.
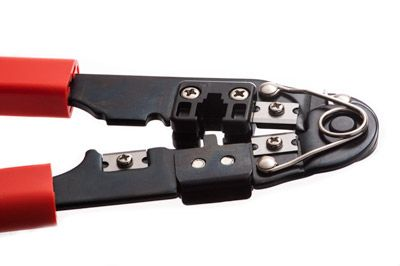
· Crimping Tool: This tool is used to press the metal pins inside the RJ45 jack connector into the Cat6 cable wires.
· Wire Stripper/Cutter: For removing the outer jacket and trimming the individual wires inside the Cat6 cable.
· Cable Tester: Although optional, a cable tester is highly recommended to verify that the connection is correct and functioning properly.
1.1 Remove the Outer Jacket
Begin by stripping off about 1 inch (2.5 cm) of the outer jacket from the Cat6 cable. This exposes the twisted pairs of wires inside. Be careful not to nick or damage the internal wires during this process.
1.2 Strip the Individual Twisted Pairs
Next, strip approximately 0.5 inches (1.27 cm) of insulation from each of the four twisted pairs within the Cat6 cable. Make sure that you do not fray or damage the wires as you strip them.
1.3 Arrange the Wires
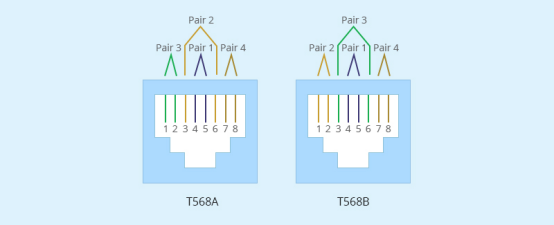
For a proper connection, arrange the wires according to the T568A or T568B wiring standard. Here’s the common order for the T568B standard:
· Pin 1: White/Orange
· Pin 2: Orange
· Pin 3: White/Green
· Pin 4: Blue
· Pin 5: White/Blue
· Pin 6: Green
· Pin 7: White/Brown
· Pin 8: Brown
Ensure that the wires are straightened and lined up correctly to fit into the RJ45 connector.
2.1 Align the Wires
Carefully insert the arranged wires into the RJ45 jack connector. Each wire should go into its designated slot within the connector. The wires should reach the end of the connector for a secure fit.
2.2 Check the RJ45 Connector
Before crimping, double-check that all wires are fully inserted and correctly aligned. The RJ45 jack connector should fit snugly on the cable.
3.1 Use the Crimping Tool
Place the RJ45 connector into the crimping tool. Firmly squeeze the tool to press the metal pins inside the connector into the wires of the Cat6 cable. This creates a solid connection between the wires and the RJ45 connector.
3.2 Verify the Connection
After crimping, inspect the RJ45 connector to ensure all pins are properly engaged with the wires. A secure crimp is essential for a reliable Ethernet connection.
4.1 Use a Cable Tester
To confirm that your connection is correct, connect both ends of the cable to a cable tester. The tester will show if there are any wiring issues or faults. This step is crucial for ensuring that your RJ45 jack connector and Cat6 cable work properly.
4.2 Troubleshoot Issues
If the cable tester indicates errors, recheck the wiring order and ensure that the crimping was done correctly. Adjust and re-crimp if necessary to fix any issues.
· Follow the Wiring Standard: Always use the same wiring standard (T568A or T568B) on both ends of the cable to avoid connection issues.
· Avoid Excessive Stripping: Only strip the amount of cable necessary to prevent weakening the cable and to ensure a clean connection.
· Use Quality Connectors and Tools: Invest in good-quality RJ45 connector and crimping tools to ensure reliable performance and durability.
|
Mistake |
Solution |
|
Misalignment of Wires |
Verify the wiring order before crimping. |
|
Over-stripping the Cable |
Strip only the required length of insulation. |
|
Failing to Test the Connection |
Always use a cable tester to check for issues. |
By adhering to these best practices and avoiding common mistakes, you can ensure that your Cat6 cable and RJ45 jack connector provide a stable and high-performance network connection.
For further assistance or more advanced topics related to RJ45 connectors and Ethernet cabling, you may explore additional resources and tutorials.
1. What is the difference between an RJ45 jack and an RJ45 connector?
· An RJ45 jack is a female RJ45 connector, typically found in wall plates, network panels, and devices. It receives the male RJ45 connector, which is attached to the end of a network cable. The jack is stationary, while the connector is portable.
2. Can I use an RJ45 connector for Cat5 cables as well?
· Yes, an RJ45 connector is compatible with both Cat5 and Cat6 cables. However, using a Cat6 cable with an RJ45 connector designed for Cat6 will ensure better performance, as Cat6 cables support higher speeds and frequencies compared to Cat5.
3. How do I know if I have a good crimp on my RJ45 connector?
· A good crimp is indicated by a snug fit of the RJ45 connector on the cable and proper engagement of the metal pins with the wires. After crimping, check the connector visually and use a cable tester to verify that the connection is correct.
4. What should I do if my cable tester shows an error?
· If your cable tester indicates an error, recheck the wiring order and ensure that the wires are correctly aligned inside the RJ45 connector. If necessary, re-strip the wires and re-crimp the connector to resolve any issues.
5. Can I use a cable tester to troubleshoot network problems?
· While a cable tester is useful for verifying the integrity of your connections, it may not diagnose all network issues. For troubleshooting network problems, consider using network diagnostic tools or consulting with a network professional.